Creating and Tracking Pro Bono Obligations
When your organization holds trainings attended by pro bono advocates, LegalServer provides you with tools to track their attendance and ensure that they fulfill any pro bono obligations created by their attendance. In this document you'll learn how to create a pro bono obligation, how to indicate that an obligation has been satisfied, and how to track a pro bono advocate's pro bono obligations.
Enabling the Pro Bono Obligation Tracking Feature
Tracking pro bono obligations is a feature that site administrators must enable, so let's first cover the administrative setup.
Pro Bono Settings
-
Click on the Admin tab at the top of the page.
-
Click on Pro Bono Management on the left side of the page and select Pro-Bono Settings from the list in the resulting screen.

-
-
Optionally, you can type "pro bono" in the Search Admin Options box and select Pro-Bono Settings from the list of results. (This feature is only available in the new interface.)
-

-
In the Pro Bono Settings screen, make sure Pro Bono Obligation Tracking is enabled.

-
In order to use the pro bono obligation tracking feature, your organization must be using a dynamic process, form, and profile for creating new outreach events. You can find out if your organization is already using a dynamic process in either of the following ways:
-
Examine the URL
-
The fastest way to determine if your organization is using a dynamic process is to start the process and check the URL for the word "dynamic".
-
Click the Outreach tab. (This may be called Non-Client Matters or Other Matters in your system.)
-
Under the Actions menu, select New Outreach. (In the classic version, this link will appear on the right side of the screen.)
-
-

-
Now take a look at the URL in your browser's address bar. If you see "dynamic" in the address, your organization is already using a dynamic process to create new outreach events. If not, you will need to create a new dynamic process in order to use the pro bono obligation tracking feature in LegalServer.

-
-
Use the Admin Tab
-
This method is not as fast as checking the URL, but you will need to use this method either to create a new process or to locate the existing dynamic process.
-
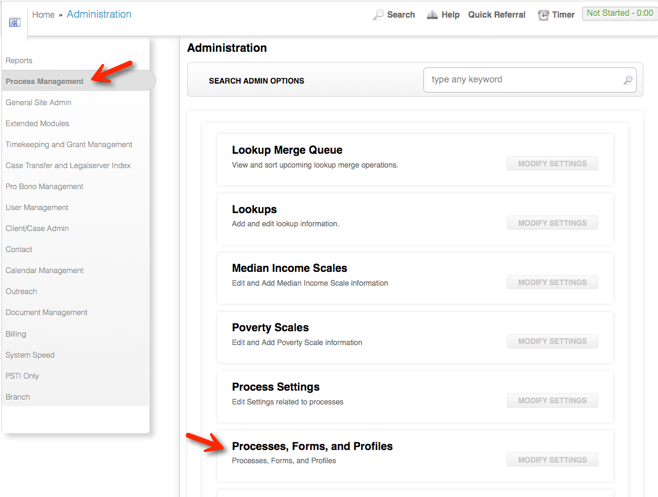
From the main admin screen, click on Process Management on the left side of the screen and select Processes, Forms, and Profiles from the list in the resulting screen.
-
-
-
-
-
Optionally, you can type "process" in the Search Admin Options box and select Processes, Forms, and Profiles from the list of results. (This feature is only available in the new interface.)
-
-

-
-
Select the Outreach module from the Select Module drop-down at the top of the screen.
-
-
If your organization is using a dynamic process for creating new outreach events, you will see a process in the list with the Outreach Create type. If not, you will need to create a new dynamic process, form, and profile for creating new outreach events. (If you need to create a new dynamic process for creating new outreach events, see Outreach - Customizing the Processes, Forms, and Profiles for instructions.)

The Dynamic Form
-
If your organization is already using a dynamic form for creating new outreach events, you will need to configure the form so it makes use of the pro bono obligation tracking feature. (If you need to create a new dynamic form, see Outreach - Customizing the Processes, Forms, and Profiles for instructions.)
-
Find the dynamic form in the Processes, Forms, and Profiles screen and click the Edit icon.
-
Image
-
-
In the edit screen, make sure the following elements are enabled:
-
Field: Pro Bono — this field allows users to select pro bono advocates as attendees at this event
-
Block: Pro Bono Credits — if your organization awards continuing legal education credits for its trainings, you will want to include this block so pro bono advocate attendees can have credits added to their profiles
-
Block: Pro Bono Obligation Tracking — this block is required to create a pro bono obligation for an outreach event and allows users to specify the number of cases and/or clinics required to satisfy the obligation created by attendance at an event
-
-
Image
The Dynamic Profile
-
If your organization is already using a dynamic profile for displaying outreach events, you will also need to configure the profile so it displays the pro bono obligation tracking information. (If you need to create a new dynamic profile, see Outreach - Customizing the Processes, Forms, and Profiles for instructions.)
-
Find the dynamic profile in the Processes, Forms, and Profiles screen and click either the name of the profile or the Edit icon.
-

-
-
In the edit screen, make sure the following elements are enabled:
-
List View: Pro Bono Attorney Statuses — displays the pro bono advocates selected as attendees and allows users to record advocates' attendance at the event
-
List View: Pro Bono Attorneys Needing Credit — displays the status of the pro bono obligation of the advocates selected as attendees. TIP: It would be helpful to add a header along with this list view, such as "Pro Bono Attorneys Who Attended and Incurred an Obligation."
-
Field: Number of Cases Needed to Satisfy Obligation — displays the number selected in the Pro Bono Obligation Tracking block in the dynamic form
-
Field: Number of Clinics Needed to Satisfy Obligation — displays the number selected in the Pro Bono Obligation Tracking block in the dynamic form
-
Field: Ethics Credit — displays the number selected in the Pro Bono Credit block in the dynamic form
-
Field: Substantive Credit — displays the number selected in the Pro Bono Credit block in the dynamic form
-
Field: Total Credit — displays the total generated in the Pro Bono Credit block in the dynamic form
-
-

Creating a Pro Bono Obligation
With the pro bono obligation tracking feature enabled, you can create outreach events that impose pro bono obligations on attendees by following these steps:
-
Click on the Outreach tab at the top of the screen. (This may be called Non-Client Matters or Other Matters in your system.)
-
Under the Actions menu, select New Outreach. (Actions links appear on the right side of the screen in the classic version.)
-
Complete the form to create a new outreach event.
-
NOTE: Depending on how your site administrator configured the new outreach form, your form may look different from the one shown in the example.
-
To attach a pro bono obligation to this event, set Create Pro Bono Obligation to "Yes".
-
Then enter the number of cases and/or clinics required to satisfy the pro bono obligation. In our example, pro bono advocates who attend the Sample Pro Bono Training will be required to take one case and participate in one clinic event to satisfy their obligation.
-

-
Click the Continue button in the lower right corner of the screen to save your new outreach event and view the outreach profile.
-
You can add pro bono advocates to the list of attendees during the creation of the outreach, or you can come back later to add them. To do this, just open the outreach event's profile and select Edit this Outreach from the Actions menu.

-
To add pro bono advocates, use the Pro Bono field to search for them by name.

Recording a Pro Bono Advocate's Attendance and Obligation
Assuming your site administrator has configured the dynamic profile as described above, you can record a pro bono advocate's attendance at an outreach event by following these steps:
-
Open the outreach's profile page.
-
Scroll down to the "Probono Attorney Statuses" field and click Edit Status next to the advocate's name whose status you want to update. For this example, we'll edit Joe Pro Bono's status.

-
In the Outreach Probono Attorney Status screen, select "Attended" from the Status dropdown and "Yes" for Create a Pro Bono Obligation.
-
Click the Continue button in the lower right corner to save your changes and return to the outreach profile page.

-
You will now see that Joe's status has changed to "Attended" and he is now listed in the "Pro Bono Attorneys Who Attended and Incurred an Obligation"

-
NOTE: The obligation displayed in this list view refers only to the obligation created by this particular outreach. To track all of the pro bono obligations a particular pro bono advocate has incurred, you have to follow the steps outlined in the Tracking a Pro Bono Advocate's Obligations section below.
Satisfying a Pro Bono Obligation
You can configure your outreach event so that pro bono advocates can satisfy their obligations by taking cases and/or participating in clinic events. Let's discuss each of these in turn.
Case Assignment
-
You can indicate that a pro bono advocate has satisfied a pro bono obligation during the case assignment process. (For detailed instructions on assigning cases to pro bono advocates, see Recommending Pro Bono Advocates for Case Assignments.)
-
When the pro bono obligation tracking feature is enabled in your system, you will see a field called Satisfies Outreach Training Credit in the case assignment screen.
-
Select an outreach event from the dropdown to indicate that this case satisfies the obligation created by attendance at that event.
-
If the pro bono advocate has no outstanding pro bono obligations that could be satisfied by this case assignment, instead of a dropdown you will see a message that no obligations were found.
-
-

Clinic Participation
-
You can also indicate that a pro bono advocate has satisfied an obligation during the clinic event assignment process.
-
NOTE: This option is only available to sites that use the Clinic module in LegalServer.
-
-
To assign a pro bono advocate to a clinic event, click on the Clinic tab at the top of the screen.
-
Click the Upcoming Clinic Events tab in the resulting screen and click on the date of the clinic event you want to view.

-
Under Options on the left side of the screen, click Assign a User to Clinic Event. (In the classic version, this link appears on the right side of the screen.)

-
Select a pro bono advocate from the list and click Assign.
-
TIP: To search for a specific advocate, use the "Last Name" filter in the listview.
-

-
If the pro bono advocate you selected has any unsatisfied pro bono obligations that this clinic event can fulfill, you will then see a screen that allows you to select an obligation for this clinic event to satisfy.

-
If the pro bono advocate does not actually participate in the clinic, you can change the status of the pro bono obligation later by editing the assignment.

Tracking a Pro Bono Advocate's Obligations
-
To track a specific pro bono advocate's pro bono obligations, you must first find the advocate. (See Finding a Pro Bono Advocate in LegalServer for detailed instructions on locating a pro bono advocate in your system.)
-
NOTE: These instructions are based on the default user profile in LegalServer. If your site uses a dynamic user profile, your user profile screen may look different from what is shown here.
-
You can determine if your site uses a dynamic user profile if the URL for the profile page contains the word "dynamic."
-
If the user profile is dynamic, your site administrator must enable the Pro Bono Obligations list view so you can track advocates' pro bono obligations.
-
-
-
In the advocate's user profile, scroll down to the bottom of the screen.
-
At the bottom of the screen, you will see a group of tabs. Click on the Pro Bono Obligations tab.
-
In the Pro Bono Obligations tab, you will see a list of the pro bono advocate's obligations. For illustrative purposes, let's focus on the obligations that Joe Pro Bono incurred by his attendance at the Sample Pro Bono Training, which required him to take one case and participate in one clinic, as shown below.

-
When we assigned Joe a case in the Case Assignment section of this document, he fulfilled this part of his obligation from the Sample Pro Bono Training. This is reflected in the Pro Bono Obligations tab in Joe's user profile. Note that the name of the client is listed in the Cases column to indicate which case satisfied this part of the obligation.

-
And when we assigned Joe to the Domestic Violence Clinic event in the Clinic Participation section of this document, he fulfilled the other part of his obligation. This is also reflected in Joe's user profile. Note that the name of the clinic and the date of the event are listed in the Clinics column to indicate which clinic event satisfied this part of the obligation.
