Collecting Case Specific Information During Intake
A common step in the intake process is to gather specific information about the matter based on the nature of the specific legal problem involved. In LegalServer, you can create custom case questions and case specific forms that display during intake. You can also recall this information if the intake results in an open case. This page discusses the administrative setup for the case questions and case specific forms.
Creating the Case Questions Form
For a general overview of creating dynamic forms in LegalServer, please see Process Management.
Click on the Admin tab at the top of the page.
From the main admin screen, click on Process Management on the left side of the screen and select Processes, Forms, and Profiles from the list in the resulting screen.
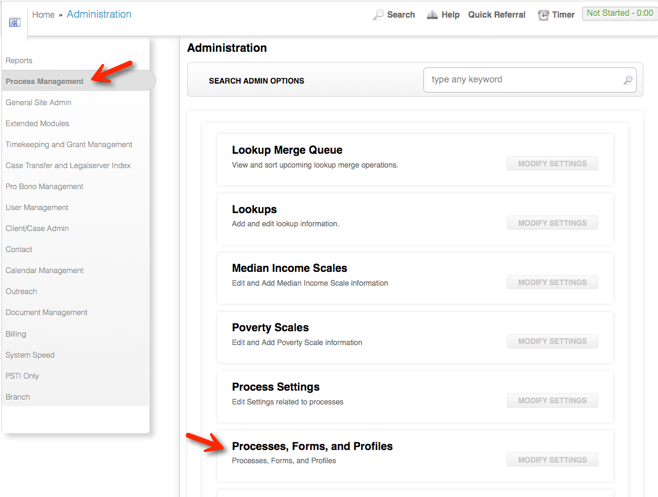
Optionally, you can type "process" in the Search Admin Options box and select Processes, Forms, and Profiles from the list of results. (This feature is only available in the new interface.)

Make sure "Case/Matter" is selected in the Forms and Processes for Module dropdown.
If it is not already selected, click on the Processes tab.

-
Find the process your organization uses for intake. If you are not sure what the process is called, try entering "intake" in the search field.
-
If your organization does not yet have a process for intakes, please see Building and Editing Intakes for an overview of the administrative setup for intakes.
-

-
When you have found your intake process, click the Edit icon to open the process for editing.
-
Scroll down the page to the Enabled Forms section.
-
Click the link in the yellow bar above the enabled forms to create a new intake form for case questions.

-
The Intake Form page will open. In the Name And Description section, do the following:
-
Name the new intake form something like "Case Questions" to indicate that this is the main case questions form.
-
For the Continue button text, enter something similar to "Save & Next" if this form appears in the middle of a multi-step intake process.
-
Be sure to set the Active and Add Continue Button fields to "Yes".
-
If it is not already selected, for the Process Type field, select "Intake".
-

Case Specific Questions Block
-
One way to configure the case questions form is to use the Case Specific Questions block, which displays different questions to users based on the case's problem code.
-
TIP: Some of the configuration options in this block have been deprecated, so you might find that the Branch Logic or Conditional Branch Logic Form Include blocks provide better alternatives for setting up your case questions form. See the Branch Logic Tools for instructions on using these blocks.
-
-
In the Form Elements section, scroll down to the dropdown list and select Block.
-
In the new dropdown list, select the Case Specific Questions block.
-
TIP: A quick way to find the block is to use the search field at the top of the dropdown list. In this instance, if you enter "case specific" in the search field, this block will be the only result.
-
-
Click the Add button to add the block to your form.

-
Now click on the plus (+) sign next to Block: Case Specific Questions to open the configuration options for the block.
-
-
Show Problem Code Text Area — if enabled, users will have the option of entering problem codes manually in a text box rather than locating them in the problem code dropdown list.
-
Problem Code Read Only — when this is enabled, users will not be able to change the legal problem code.
-
NOTE: In order for this setting to work properly, the legal problem code must be set in a previous step of the intake process, before the case questions form is displayed.
-
-
Show Special Problem Codes — if enabled, a dropdown list of special problem codes will appear when the case has a problem code that has associated special problem codes.
-
Allow multiple special problem codes — if enabled, the special problem codes dropdown list will instead appear as a multi-select list.
-
Special Problem Code Default Empty — if enabled, prevents the first special problem code associated with the legal problem code from being pre-selected.
-
Show Standard Questions — this feature has been deprecated and should not be used in new forms. A better practice is to use the notes field, which is discussed in the Notes Block section of this document.
-
Show Case Specific Questions — if your organization uses case-specific questions forms (i.e., intake questions that vary based on the legal problem code of the case), enabling this field will cause case-specific questions to appear if the case has a problem code for which a case-specific questions form has been created. For detailed instructions on case-specific questions forms, please see the Creating Case Specific Forms section of this page.
-
Show Legal Category — if enabled, a dropdown of general legal issues with problem code ranges will appear before the legal problem code dropdown. The legal problem codes available will be limited by the user's selection of a legal category.
-
NOTES:
-
Do not enable this in your case questions form unless your organization has defined a set of categories and linked legal problem codes to the categories.
-
Using the legal category dropdown in your form will cause the page to reload each time users make a selection from the dropdown, which could result in delays.
-
Enabling this feature in your case questions form will have no impact on your ability to use legal categories in your reports. If the legal problem codes are linked to categories, those links will be reflected in reports even if you disable this feature during the intake process.
-
-
-
-
TIP: The Case Specific Questions block automatically inserts a line of white space and a header entitled "Case Fields" at the end of the block in the form, as shown below, so you do not need to add a header or white space between this block and the elements that follow it.

Notes Block
-
In addition to the case specific questions block, the Notes (Generic) block is also commonly used in case questions forms, as it provides a flexible way to gather general case information (and replaces the now deprecated Standard Questions feature in the Case Specific Questions block).
-
Find the Notes (Generic) block in the block dropdown list and click Add.
-
Open the configuration options by clicking the plus (+) sign next to Block: Notes (Generic).

-
-
Note Type — in the dropdown list, select "Intake Notes".
-
Size of Notes Field — select an option to define how large you want to make the text box, bearing in mind that users can often manually re-size the box. Also, if you enable the Show Expand Button option, users will be able to enlarge the box.
-
Custom Label — if desired, you can enter text for a label that will appear to the left of the text box.
-
Default Value — use this field to enter default text for the notes field. In the example, the default value is used to structure the notes field. Users can overwrite the default value with their own text.
-
Show Save Button — if enabled, users will be able to save the text they enter in the notes box without also saving the rest of the information on the page.
-
Require Note — if enabled, users will not be permitted to proceed to the next step in the intake process unless they have entered text in the notes textbox.
-
-
TIPS:
-
You can define additional note types for this block by editing the "Note Types" lookup. Please see Lookup Lists for information about editing lookup lists.
-
Only one block of each type can be used per case/matter, so if you add any new note types, the "Singular" field must be set to "Yes", as shown in this example:
-

-
-
As long as you add only one of each singular note type, you can add multiple Notes (Generic) blocks to your form to collect different categories of information about the case.
-
Publication Selection Block
-
Another commonly used block in case questions forms is the Publication Selection block, which allows users to select documents to provide to the client during the intake process.
-
This block allows users to select documents to send to the applicant by dragging them from a list of available documents to a queue. It also allows users to filter the available documents by problem code, language, and keywords.
-
NOTE: In order to use the publication selection block, your site must have the Publications module enabled. For information about this module and how to create publications, please see Publications.
-
-
Find the Publication Selection block in the block dropdown list and click Add.
-
Open the configuration options by clicking the plus (+) sign next to Block: Publication Selection.

-
-
Show Cover Letter Dropdown? — if enabled, users will be able to choose whether to include a cover letter with the documents they select to send to the applicant.
-
NOTE: This option should only be enabled if you have a cover letter template in your system.
-
-
Calculate Default Cover Letter — do not enable this option unless you have a cover letter template in your system that has been configured for this use. Please see the Publications page for further details.
-
Allow Email? — if enabled, users will be able to e-mail the selected documents directly from an e-mail form within the block.
-
-
When you have finished configuring the case questions form, scroll down to the bottom of the page and click Continue to save your changes.
Creating Case Specific Forms
-
After you have created the case questions form, you can create case specific forms to gather different kinds of information based on the legal problem code of the intake. You can also use these forms to present intake staff with instructions related to specific legal problem codes.
-
Click on the Admin tab at the top of the page.
-
From the main admin screen, click on Process Management on the left side of the screen and select Processes, Forms, and Profiles from the list in the resulting screen.
-
-
Optionally, you can type "process" in the Search Admin Options box and select Processes, Forms, and Profiles from the list of results. (This feature is only available in the new interface.)
-
-
Under the Actions menu, click on New Case Specific Form. (In the classic version, you will find this link on the right side of the screen.)

-
Give the form a name that you can easily correlate with a legal problem code. Typically, administrators name case specific forms so they match the way problem codes are listed in the legal problem code lookup.
-
Set Active to "Yes".
-
If you are only going to use case specific forms as subforms in the case questions form, you can leave Continue Button Text blank and set Add Continue Button to "No". If these options are enabled, however, they will not show up when the case specific form is displayed in the main case questions form.
-
If it is not already, set the Form Type to "Case Specific Form".
-
Select the legal problem code from the Problem Codes multi-select list.
-
TIP: To link this form to multiple problem codes, hold down the CTRL key (or Command on a Mac) while you select the problem codes.
-
-
If your organization uses special problem codes (and you configured your case questions form to include such codes), you can also select special problem codes from the Special Problem Codes multi-select list.
-
TIP: You can also link this form to multiple special problem codes by holding down the CTRL key (or Command on a Mac) while selecting special problem codes.
-

Form Elements
-
In the Form Elements section, you can configure the case specific form just as you would any other form. Typically, case specific forms include some combination of the following elements:
-
Headers — use a header to identify the legal problem code associated with this case specific form or describe the purpose of the instructions and fields that follow.
-

-
-
Fields — if you need to capture specific information related to this legal problem code in a field that can later be used for reporting, you can add fields to your case specific form.
-
Instructions — use this element to present intake staff with information about the legal problem code, a script of questions to ask during the intake, and so on.
-

-
-
-
Show these instructions inline — enabling this setting will result in the instructions displaying as part of the body of the form.
-
Number of lines — this setting only affects instructions displayed inline. You might need to experiment with this setting for your forms, depending on the length of the instructions text.
-
TIPS:
-
For long inline instructions, you should set the number of lines to 5 or more. If it is set to 4 or less, no scroll bar will appear even though some text might be cut off, although users will still be able to scroll using arrow keys and mouse scroll wheels.
-
If you leave this field blank, the system will automatically fit all of the instructions on the page, regardless of their length.
-
-
-
Show these instructions when hovered over — if enabled, the instructions will only appear when users hover over the question mark icon.
-
TIP: If both inline and hover are enabled, the hover setting will be applied. If neither setting is enabled, the system will display the instructions inline by default.
-
-
Show line breaks — if enabled, the system will display the instructions with line breaks. Otherwise, they will be displayed as one continuous line of text.
-
Format as HTML — enable this setting if you want to use HTML tags to format your instructions.
-
TIP: If you opt to show the instructions when hovered over, the system will recognize HTML tags even if this setting is not enabled.
-
-
Label Text — use this field to give the instructions a name. This is especially helpful if you set the instructions to display on mouse hover.
-
TIP: This label will not appear if the instructions are set to display inline.
-
-
-
Creating an Auxiliary Form for Later Review of Case Questions
If your organization decides to open a case as a result of an intake, users may want to be able to review information gathered in the case questions form later on. There are two ways to make the case questions available for later use. The option you choose will depend on how you configured the case questions form and what you want users to be able to see after the case has been opened.
Using the Existing Case Questions Form
One option is to use the existing case questions form as is. This simple solution presents the case questions form to users in the same manner as it appeared during the intake.
-
First make sure you are on the Processes, Forms, and Profiles admin page.
-
Click on the Primary Forms tab.
-
Open the Case Questions form for editing by clicking on its edit icon.

-
In the Process Types multi-select list, add Auxiliary by selecting it while holding down the CTRL key (or Command on a Mac).

-
When you have finished, scroll down to the bottom of the page and click Continue to save your changes.
Using a New Auxiliary Form
If you do not want to use the existing case questions form, you can create a new auxiliary form to display only the case specific questions block. This option is a little more complicated, and it requires you to maintain two separate case specific questions block configurations. It might be a good option, though, if your case questions form contains elements you do not want users to see after the case has been opened.
-
Under the Actions menu, click on New Auxiliary Form. (In the classic version, you will find this link on the right side of the screen.)

-
Name the new form something like "Review Intake Questions".
-
Set Active and Add Continue Button to "Yes".
-
Make sure the Process Type is set to "Auxiliary".

-
Optionally, you can add a Header to give the form a name.
-
Add the Case Specific Questions block to the form.
-
Click the plus (+) sign next to Block:Case Specific Questions to open the configuration options.

-
-
The only required configuration here is to enable Show Case-Specific Questions.
-
The other options will depend on how you want the form to appear. See the Case Specific Questions Block section of this document for details about the configuration options in this block.
-
TIP: To prevent users from changing the problem code for the case, enable the Problem Code Read Only setting.
-
Creating the New Auxiliary Process
Regardless of the option you choose above, you will need to create a new auxiliary process to give users access to the case questions from the main profile of an open case.
-
Make sure you are on the main Processes, Forms, and Profiles admin page.
-
Under the Actions menu, click on New Auxiliary Process. (In the classic version, you will find this link on the right side of the screen.)

-
Name the new process something like "Review Intake Questions" so users will be able to identify its purpose.
-
Set Complete and Active to "Yes".
-
Set Link Category to "Auxiliary".
-
In the Case Dispositions to Show mulit-select list, select "Open". You can also add others by holding down the CTRL key (or Command on a Mac) while selecting them.
-
Find the form you want to use for reviewing case questions in the Disabled Forms list.
-
TIP: The easiest way to locate it will likely be the find function in your browser.
-
-
Drag and drop the form in the Enabled Forms area.
-
If it is not already, set the Followup Profile to "Main Profile".
-
Click Continue in the lower right to save your new process.
